Image Map

Monday, July 29, 2013

Monday Made It


Today is Monday so it's linking time with Tara over at 4th Grade Frolics.


Oh--Monday! My last one...before school. Three days! As in PD starts on Thursday!

Thankfully I have been able to work in my room and have finished all the little things that need to be done.

I made this Chevron wreath for my classroom door. All the supplies came from Hobby Lobby: wire frame, chevron burlap ribbon, and solid burlap ribbon. I wasn't sure how to make one so just googled and got directions for the wreath and bow.


Sorry for the quality of photo--I left my camera at home.

I didn't make the next addition to my classroom but I saved 20% at Bed, Bath, and Beyond!


And my final make it==a nap! Last few days need to include a nap on the couch with my best little bud:


Wednesday, July 24, 2013

Michaels Ideas

I've been getting some great inspirations from Michael's instagram. It's nice not to have to be creative--in the sense of thinking up ideas. I'm a good copier!

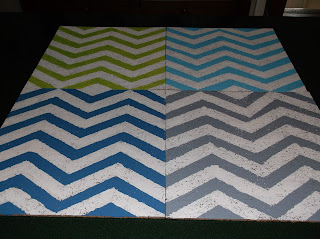
I went to Michaels and picked up a pack of cork tiles (4 for $10.00) but used my 40% coupon plus the teacher discount. They had acrylic paint for half price so it was only 39 cents a bottle. I had sponge brushes and painters tape.

First step was to paint all the cork an almond color.


Then came the measuring part since I wanted them in four different colors of chevron. I googled "how to paint chevron" and came up with easy enough directions. It was a matter of drawing lines and making rectangle boxes. Then adding the tape from corner to corner on a diagonal. Lots of taping but not a difficult chore. (If I can figure it out I KNOW you can also!)

Then it was a quick process of adding the colors. 

As soon as I finished painting I removed the tape and let it dry. I touched up the almond color to hide the lines I had drawn.


I dropped by school and hot glued those babies to the wall. (Do you love hot glue also?)


Finished and hung!


Sunday, July 14, 2013

Classroom Sneak Peak

It's getting closer. Time. for. school. August 1. Need I say more?

I spent a few hours at school tossing and tossing old stuff. When I get in a cleaning mood I get in a throw it out mind-set.

Since our district is moving to a literacy based concept I tossed all our old reading series files.


Do you see the leveled readers below this bulletin board? I pulled them out of the display boxes and saved them. I do plan to use them in guided reading so I didn't toss those!

The new, cleaned off area:


I pulled out my little storage "benches" that Mr. Spouse built and placed those at the end of the desks.

From this:

To this:


The baskets go inside their desks to hold various items so that I can't see the orderly disarray inside. (Picture hidden unfinished work that I couldn't possibly know that is missing?)


I'm thinking of displaying our common core standards (I Can statements) that are required to show that I indeed am a Tennessee teacher who is going to be evaluated on said standards. I really need to have them close to our meeting area. 


I did have half of the student book baskets stored in this area but since I may use those little storage benches near their desks I have placed the science area/journals there. I will move all my non-fiction book baskets to this bookcase. The ones pictured in the blue baskets are actually author studies and chapter books. Above the area is my Daily 5 choice pocket charts. I'm a little undecided as to how those will go with our new "balanced literacy" reading/writing workshops. I am more of a Reading Workshop person than a Daily 5 so I sort of made my own way to combine both.

Well, this week I have three days of Common Core training. 


Wednesday, July 10, 2013

Target Find

When July 4th rolls around passes by we know that it is back to school time in my district. Three weeks from tomorrow our staff development begins. That gives me 21 days to search for all the back to school sales, dollar spot items, latest classroom needs=fun times.

I saw on someone's blog last night a picture of the newest pocket charts at Target. Could it be? Really? The aqua color I really hoped for? Yes! I went to two different Targets today. The first one is further away but a much bigger store with an actual organized Dollar Spot. They had two! A little disappointed because the other Target has the tiniest Dollar Spot and I really didn't hold out much hope. But since it is in the area of my school I decided to give it a try. They had several so I snatched up six more.


This year the colors I found were aqua (you knew that already didn't you?????), yellow, and red. I got a yellow one for no reason whatsover. 

Since I'm using the chevron colors I changed my focus Reading wall with the exact color I so craved.


I did  a little work in the room today--adding the banner for the focus wall, and putting a border around my door with a welcome banner, and arranging the student desks. 

My latest dilemma is driving. me. crazy! I cannot figure out where to place my chart stand so it doesn't hide the word wall or reading focus wall. I've tried to open up the classroom to allow more freedom of movement for reading and work stations. I hope it comes together--in the next 21 days!

Tomorrow is another day. So maybe I'll go shopping again!


Saturday, July 6, 2013

Oh, NO!

This is what. gulp. I saw:


Sorry for the quality of the picture. It may have been iphone. It may have been my hands were shaking  Could it be? 25 days til I begin.


Wednesday, July 3, 2013

Assigning Book Nooks

Reading is such a big part of first grade. I use the reading workshop approach so independent reading is used every day. I was inspired by a Pro-teacher blog: Once Upon a Reading Workshop. Andrea provided wonderful resources for lots of teachers. She had her kids in the gprreatest reading "nooks" in the classroom and I began using that idea several years ago. In order to have some routine for moving quickly to a reading spot I placed these labels around the classroom. Each week I rotate where the kids will go. I had made the large labels that go around the room. I thought I would need to make similar ones that were much smaller that I place in one of the dollar Target pocket charts. By placing the small cards in a vertical row I can put the partner names next to the book nook number. Each Monday I move the book nook cards down one row so that the partners will move to a different nook.

 I found out that it is easy to print them smaller by adjusting the print features. I printed the slides four to a page which made them exactly the correct size.

I like to find easy help, don't you?


You are welcome to use these if you wish. I'd love a comment on what tricks you have found that help in Powerpoint documents!